The best way to get your daily veg…

Recently a good friend and I did a typical weekend wander through one of our local farmers markets.  This particular market isn’t very large, but the diversity and quality of produce is really worth the trip.  We ended up buying some ridiculous number of pounds of heirloom tomatoes with the sole intention of making fresh Bloody Mary’s out of them.  We juiced the tomatoes. We juiced lemons.  We juiced garlic and fennel and onions.  We juiced as if it were the only appliance in the kitchen.  We did add a little bit of V8 to round out the flavors, add a little consistency to the texture and give it a salt kick.  Well, and of course there was the vodka.  Honestly, I have can only think a few other examples where I have had a fully homemade version that is so VASTLY superior to the normal thing that they are almost not even the same thing.  All I can say is this.  Quick!  Get thee to the market.  Buy a ton of the most colorful, crazy looking tomatoes you can find.   Break your juicer out of hiding  (you know you have one somewhere) and be one with the mixology.  Experience the intensity of flavor, smell, and the incredible visual treat that the foamy multicolored juice delivers.  

It is worth it like you just can’t believe.  Our recipe was inspired by the classic version from Cook’s Illustrated:

Cindy’s Summer Bloody Mary’s

  • 2 cups freshly squeezed heirloom tomato juice (this includes however much garlic, onion, and fennel you included in the juice)
  • 1 cup V8 juice
  • 1 1/2 cup vodka
  • 1 tablespoon worcheshire sauce (or to taste)
  • 1 tablespoon prepared horseradish (although freshly grated root would add only good things to this recipe)
  • 1/4 cup freshly squeezed lemon juice
  • salt and black pepper to taste
  • pickle juice (completely optional and definately to individual taste)
  • squirt of Sriracha (again, completely optional and definately to individual taste)
  • celery sticks, carrots, pickles, olives – to taste – for garnish

Serve over ice and drink on the patio with friends.  Remark how you will never look at Bloody Mary’s the same way again.  Then make another batch.

Other uses for the fresh mix…marinade for steaks or chicken….add cream to the mix (if the vodka hasn’t already been added)  and freshly sliced basil for a spectacular fresh tomato soup. 

Points here?  Just for the actual vodka…so adjust accordingly.

Posted in Uncategorized | Leave a comment

Meatless Monday: Vegetable Gratin

This beautiful basic was inspired by a recipe from an out-of-press book called “Quick French Cuisine International” that was put out in 1982 by The Knapp Press.  It is good any time of year, but is particularly spectacular when fresh onions, tomatoes, and zucchini are available from the garden.  I generally serve it with a simple green salad and some garlic bread. 

Vegetable Gratin

  • 1 tablespoon olive oil
  • 1 sweet onion, thinly sliced
  • 2 cloves garlic, minced
  • 3 medium sized yukon gold potatoes, sliced very thinly
  • 3 medium zucchini, sliced about 1/8 inch thick
  • 9 Italian plum tomatoes, sliced 1/4 inch thick (or 2 1lb cans whole peeled, drained and sliced)
  • 1 cup goat cheese, crumbled
  • 1 teaspoon fines herbes
  • salt and pepper to taste
  • 12 leaves fresh basil, sliced thinly

Preheat oven to 425.  Heat olive oil in a large skillet.  Add garlic and brown slightly.  Add onions and cook over medium-high heat until soft, fragrant, and dark yellow in color.  In a 9×12 oval baking dish, arrange vegetables in alternating layers:  potatoes, zucchini, tomatoes, onions, etc.  Top with goat cheese, fines herbes, salt and pepper.  Bake uncovered for approximately 45 minutes until bubbly.  Sprinkle with basil right out of the oven.   Excellent hot or at room temperature.  Makes 6 servings at 3 points per serving.

Note:  You can also layer a 15 oz can of rinsed and drained canellini beans in with the veggies if you’d like to up the protein.  Be sure to adjust the points to 5 per serving.

Posted in Uncategorized | Tagged , , | 1 Comment

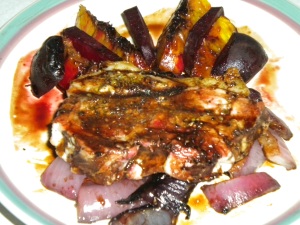
Grilled Balsamic Glazed Pork Chops with Onions, Peaches, and Beets

I look for every opportunity to cook on the grill.  It keeps the kitchen clean and at this time of year, keeps the heat outside.  This is a new favorite.  I have been experimenting with grilling all sorts of fruits and vegetables and hit on this lovely combination.  The only part of the recipe that has to be done indoors on the stove is creating the balsamic glaze.  But, you can do that up to a day ahead and have it ready to go.  I really like the sweet, yet tangy combination of this dish.  It would be particularly good with mashed potatoes (to soak up all the lovely juices) but I just served it with fresh, barely steamed, sweet corn on the cob from the farmers market.

Grilled Balsamic Glazed Pork Chops with Onions, Peaches, and Beets

  • 2 butterflied pork chops (each person gets 1 side), trimmed and separated
  • 4 medium sized fresh beets, tops and bottom trimmed off, washed but not peeled
  • 1 large red onion peeled, trimmed, and sliced in half (so you get two thick rounds)
  • 2 ripe unpeeled peaches washed, halved and pitted
  • 4 teaspoons olive oil
  • 2 cups balsamic vinegar (cheaper works better here)
  • salt, pepper, garlic, and oregano to taste

Heat grill to medium high.  Put balsamic vinegar in a small saucepan, bring to boil then turn down to a high simmer.  Leave at that temperature, uncovered, until ready to use.  It will reduce to about 1/2 a cup and will be very thick and shiny.  Rub peaches, onions and beets with olive oil and sprinkly with salt (on both sides).  When grill is hot, put onions and beets on grill.  Set timer for 10 minutes.  Meanwhile, sprinkle each side of the pork chops with salt, pepper, garlic powder, and oregano.  When 10 minutes is up, flip onions and beets and add peaches and pork chops to grill.  Set timer for 5 minutes.  Then flip peaches and pork chops.  Set timer for another 5 minutes…then everything will be ready to come off the grill!  Bring in on a platter with sides, pour most of the balsamic glaze over everything.  Cover with foil and set aside to rest for 5minutes.  To serve, slice onions and beets and peaches.  Place a quarter of them on each plate and put one chop on top and drizzle with remaining glaze.  Each serving is 6 points.

Posted in Uncategorized | Tagged , , , , | Leave a comment

Fruit O’The Day: Michigan Tart Cherries

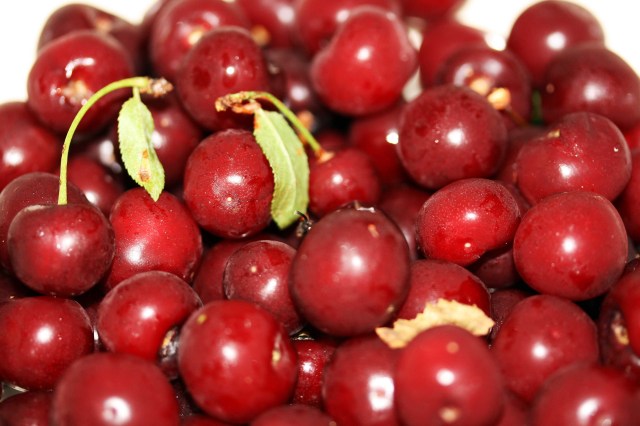
So, I have just moved from my beloved sunny south to the midwest.  (Hence my lack of posts the last two weeks.)  This means I have to learn a whole new way of thinking about seasons, local food, and regional traditions.  It is an adventure and I’ve decided to start off by learning how to work with a new fruit: Michigan tart cherries.  Serendipitiously, the Spilled Milk episode on Sour Cherries recently aired and at that point I had never heard of them.  But here in my new state, in and among the beautiful northwestern sweet cherries, I found them.  Look at these beauties!

I thought about trying to make jam or jelly, but it seemed like I should start with something I already make.  I decided on serious comfort food:  cobbler.  To start with I had to figure out how to pit the silly things.  Here is my method.  A well-placed, but gentle, squeeze behind the pit, such that the pit pops out of the hole that the stem would be in seems to be the most efficient way.  There are, apparently, specialized kitchen tools for cherry pitting.  As evidenced by this“how-to” video  from YouTube touting their particular tool.  I found that my low-tech method works just fine.  The only drawback is the incredible amount of cherry juice splatters that I managed to get virtually everywhere.  Looked like a scene from a slasher movie!

Anyhow, this recipe isn’t particularly ww friendly, in fact, I won’t even bother giving the points to you.  But, if you are judicious about how much you eat at one sitting, you could plan for it just like any desert.  This is comfort food at its finest and any fruit (or combinations of fruits) can be used. 

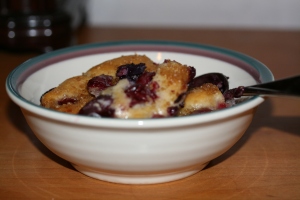
Tart Cherry and Blueberry Cobbler

  • 1 cup pitted tart cherries
  • 1 cup blueberries
  • 1 stick of salted butter
  • 1 cup self-rising flour
  • 1 cup milk
  • 1/2-3/4 cup granulated sugar (depending on sweetness of fruit)
  • 2 teaspoons coursely granulated turbinado sugar

Wash and pat dry the fruit.  Place in a 9×9 glass or metal pan that has been buttered or sprayed with non-stick cooking spray.  Cut the butter up into small pats and spread evenly across the fruit.   In a large bowl whisk the milk, flour, and sugar together until smooth.  Pour evenly over the fruit and butter mixture. Place in a pre-heated 350 oven for approximately 30-45 minutes.  At around 20-30 minutes check the top to see if it is ready to be sprinkled with the turbinado sugar.  You’ll know it is ready when the crust is set, but is not yet browning.  At that point sprinkle the turbinado sugar across the top  and bake until the crust is brown and the sugar is mostly melted into the crust.  Take out of the oven and cool for at least 30 mintues before serving.  Excellent on its own, but really shines with a little ice cream on the side or a dollop of fresly whipped heavy cream.  Your baking time might be altered by the amount of moisture in your fruit.  I have had this take as long as 50 minutes and be done as quickly as 30.  This recipe is very tolerant of creativity in terms of the fruit and sugar.  I have made this with apples, peaches, all types of berries, and even rubarb.  Leftovers are quite nice for breakfast the next day!

Posted in Uncategorized | Tagged , , , | 1 Comment

Take advantage of that tomato bounty!

This classic red sauce recipe is divine at any time of the year, but shows off its absolute best when made with fresh paste tomatoes and herbs from the garden or the farmers market.  It freezes like a dream, so feel free to make it up now while the ingredients are fresh and then package it in appropriately sized freezer containers for that first cold, nasty day when a steaming bowl of pasta will make everything ok.  Vegetarians can obviously leave out the beef, but it makes a significant difference in this recipe.  The sauce goes from nice to spectacular.  Growing up this was always referred to as “Real Spaghetti”.  We would ask for it instead of sauce from a jar.

  • 3-4 cans tomato pureé OR equivalent amount of fresh, skinned, crushed tomatoes (see note)
  • 1-2 cans tomato Italian spiced tomato paste (as needed to obtain desired thickness)
  • ≈ 2 lbs bone-in beef short ribs (the bones are critical here…ask your butcher if you don’t see them)
  • 1 tablespoon extra virgin olive oil
  • 1-2 large bay leaves
  • 1-1 ½ tablespoons dried oregano OR 3 tablespoons fresh oregano
  • 1 tablespoon basil OR 2 tablespoons fresh basil
  • 1-2 teaspoons garlic powder
  • 1/2 cup freshly grated parmesano-reggiano cheese (the best you can afford)
  • Salt & pepper to taste

 Sprinkle short ribs with salt, pepper and garlic powder.  Heat olive oil in bottom of heavy large sauce pan, seal/brown outside of short ribs to seal in juices (not necessary to cook through at this point) – drain out oil before adding remaining ingredients (all but tomato paste and FRESH herbs).  Bring just up to boil, then turn down heat, partially cover and simmer for 2-3 hours, stirring occasionally.  Half hour before serving, check thickness of sauce and add paste if necessary to achieve desired thickness.  Check spices and adjust as necessary, if using fresh herbs you can add them now.  If sauce is too acidic you can add EITHER a pinch of sugar OR 1/8 teaspoon of vanilla.  Remove bay leaves before serving with desired sized spaghetti noodles, meatballs, raviolis, lasagna, whatever.  Each 1/2 cup serving of just sauce is 2 pts.

Note:  If you are doing this with fresh tomatoes (which I highly recommend) there are a couple of methods for the skinning, seeding, etc.   You can use a food mill, which does all the work for you.  Or, you can do what I do.  First I bring a large soup pot of water to boil and take a large glass bowl and fill it with ice water.  Then I take a paring knife and cut a little X into the bottom end of the tomatoes.  Then I drop them into the boiling water for about 60 seconds.  Remove quickly and put in a boil of ice water.  The skins will slip right off, you can use the flaps from the X you carved to get them started.  I then chop and seed them by hand because I don’t care about precision in this step.  If I get some seeds in my sauce, who cares?  And by the way…this method for skinning also works beautifully with peaches.

Posted in Uncategorized | Tagged , , | Leave a comment

Current Obsession: Poor Girl Gourmet

Check out this awesome lady if you haven’t already discovered her.  She can be found at her outstanding blog and she has written a book of the same name, which I got for my birthday and have been reading cover to cover.  (I always read new cookbooks this way, like a new novel. Does anyone else do that?)  This woman’s approach to food rings so true to me and the majority of her recipes are either ww friendly right off the bat, or would be suitable for alteration without too much effort.  Check her out!  Maybe I will aim to start calculating the cost of each meal in addition to the ww points…hmmmm…that sounds like too much math….

Posted in Uncategorized | Leave a comment

Fruit o’ the day: Lychees

One of my favorite, but fleeting, summer fruits is the lychee.  Also known as the Lychee nut, lychee fruit. or litchi it is a tropical fruit from south asia.  The ones we get in the US are almost exclusively grown in South Florida, the only place suitable for them.  The season is very, very short.  They can only be fround in their fresh form (in the produce section of the market in little plastic clamshells) for about a month which can be May/June or June or June/July depending on how the weather worked out that particular year.  Any other time of year the only lychees available are the canned variety.  Which can be used if you making a bowl of eyeballs to put in your haunted house, but otherwise not a great product.  There are some exceptions.  But, this post is about the fresh lovelies we see now.  They are covered in a dry, bumpy, pinkish brown skin that has to be removed before eating.  Then there is the rather large dark brown pit that must be removed.  All this work reveals a translucent pearly white to pinkish flesh that has the consistency of a grape.  But a taste like no other.  It has an intense sweetness and floral quality that I find hard to describe, but really love.  I love them as part of a nice cheese board with other fruits and some nice whole wheat crackers or sourdough bread.  I have also had them in cocktails like Lychee Martinis and in baked things like Lychee Cake.  But, for my money…just fresh out of the skins with a nice glass of wine and some bread and cheese.  Points?  Not for the Lychees! (:  Give them a try before they are gone!
Posted in Uncategorized | Leave a comment

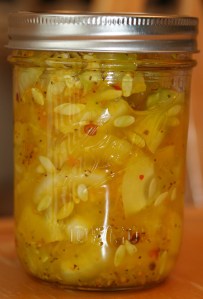
Lemon Cucumber Quick Pickles

The color and subtle flavor of these super quick pickles is spectacular!  They use the round, yellow, very mild lemon cucumbers that you can find at the farmers market this time of year.  The resulting pickles are only the tiniest bit sweet and you could reduce the sugar even further if you’d like.  The fresh tumeric and pink peppercorns can be mildly tricky to find, but are worth the effort.  Powdered tumeric and white peppercorns can be substituted in the same amounts.  If you can’t find lemon cucumbers any mild baby cucumber will do.  You could also substitute freshly grated ginger root for the crystalized ginger, that reduces the sweetness and ups the bite a little bit.  In any case, the longer the pickles chill, the more intense the flavor.  One quarter cup of pickles is one point.

Lemon Cucumber Quick Pickles

  • 1 1/2 cup unpeeled, quartered, and sliced lemon cucumbers
  • 1/2 cup quartered and thinly sliced sweet onion
  • 1/2  cup  white vinegar
  • 1/4  cup  sugar
  • 1/2  teaspoon  salt
  • 1/4  teaspoon  mustard seeds
  • 1/4  teaspoon  celery seeds
  • 1/2  teaspoon  freshly grated peeled turmeric root
  • 1/4  teaspoon pink peppercorns
  • 1/4 teaspoon finely chopped crystalized ginger
  • 2  garlic cloves, peeled & grated
  • 1 teaspoon fresh lemon zest

Place cucumbers and onions in a glass bowl; mix well. Combine vinegar and remaining ingredients in a two cup glass measuring cup; stir well.  Microwave for 2 minutes. (or pour in a non-reactive pan on the stove top and bring to a rolling boil.) Pour over cucumber mixture; let cool to room temperature.  Pour into 2 cup glass jar with lid and chill overnight.  Good for 2 weeks.

Posted in Uncategorized | Tagged , | 3 Comments

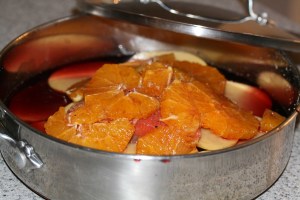
Orange and Red Wine Poached Salmon with Potatoes and Onions

I recently saw an old episode of The Two Fat Ladies where one of them cooked a recipe from the famed old English cook, Robert May (see awesome title sequence).  Robert May was the cook to the King of England and published his book “The Accomplisht Cook” in 1660.  To quote May:

“Wherein the whole Art is revealed in a more easie and perfect Method, than hath been publisht in any Language. Expert and ready wayes for the Dressing of all sorts of Flesh, Fowl and Fish: The Raising of Pastes; the best Directions for all manner of Kickshaws, and the most Poinant Sauces; with the Tearms of Carving and Sewing. An exact Account of all Dishes for the Season; with other A la mode Curiosities.”

Wow!  That must have been quite a book.  I haven’t seen the original, but as presented by the Fat Ladies it was simple and remarkably healthy.  Theirs had only 4 ingredients: oranges, red wine, salmon, and nutmeg.  I just had to put my spin on it, I hope you enjoy it as much as I did.

Orange and Red Wine Poached Salmon with Potatoes and Onions

  • 4 teaspoons olive oil
  • 1 peeled and thinly sliced red onion
  • 1 large yukon gold potato, unpeeled and sliced very thinly
  • salt & pepper to taste
  • 1 lb salmon fillet
  • freshly squeezed juice of one lemon
  • 1 tablespoon freshly grated nutmeg
  • 1 tablespoon freshly grated ginger root
  • 1 peeled and sliced navel or Valencia orange
  • 1 peeled and sliced blood orange (2 of the above will work if you can’t find blood oranges)
  • approximately 1 cup of red wine (depending on the size of your skillet)

Place olive oil in a large skillet and swirl to coat.  Place onions in a single layer on bottom of skillet.  Add potatoes in a layer on top of the onions.  Salt & pepper to taste.  Place fish fillet on top of potatoes and sprinkle with lemon juice, salt and pepper.  Layer the oranges on top of the fish and potatoes and pour red wine over top of entire dish.  Cook, uncovered on stove top at high heat until wine is boiling.  Then turn down to medium heat and cover with a tight fitting lid or foil.  Poach until fish is cooked through and potatoes are starting to soften.  It will take about 15 minutes depending on thickness of fish and potatoes.  Remove lid.  Remove fish from skillet, place on warm plate, cover with foil and set aside.  Cook potatoes and onions uncovered at medium heat for 5 minutes, turn heat up to high and cook until wine is reduced to onion level and potatoes are fork tender.  This will take maybe another 10 minutes depending on your skillet, how much wine you used, and how thickly you cut your potatoes.  Watch carefully during this time, you don’t want to lose all the wine and burn your onions.  Serve 1/4 of the fish over 1/4 of the potatoes topped with onions, sauce and oranges.  Serves 4 = 6 pts per serving.

(Technorati Claim Token HK4AKZPRUAF9)

Posted in Uncategorized | Tagged , , | Leave a comment

In praise of: Local Food

I know it sounds like I am just throwing around the hot buzzwords when I say this, but seriously, I LOVE local food.  In other words, I love food that was grown or raised within a fairly short distance of where I am cooking and eating.  There are multiple reasons for wanting to focus my cooking and eating this way.  First off, it simply tastes better most of the time.  Why?  Because if you don’t have to pick your berries when they are mostly green so that they can ship across the country without getting smushed, then they taste better. (Or ever had eggs fresh from the farm, the taste difference between that and what you buy at the store is unbelievable.) Second, it supports local economies.  Local food is often grown by small, independent farmers rather than big corporate entities.  So, all the money stays local which certainly benefits my whole local community.  Third, it reduces my environmental footprint.  If my food was grown down the street it certainly has less environmental impact than if it was grown in another country or state and shipped here.  Although there is some debate about whether is is “greener” to eat organically or to eat locally – if you can’t do both.  I have seen several articles about this, and frankly I think local may often trump organic IF you must choose.  Part of the problem is that getting certified organic though the USDA is often cost prohibitive for small non-corporate farms.  So even though your local farmer might not be certified, they might be using organic practices that are safer for the environment and your health.  OK and finally, it is usually cheaper!  So: tastier, greener, economically & socially sounder, and cheaper.  What is not to like?

There are few ways that I keep up with what is fresh and available in my local area.  First off, I shop at least once a week at my local farmers’ market.  Almost every community has one these day.  In North Carolina we have 5 state run markets in the 5 largest counties in the state.  They are permanent and open all year.  Most other communities here have seasonal markets that are only open on the weekends during the growing season.  I visit a few of those once in a while too because they will often feature specialty producers that don’t come to the main market.  Surf around the internet and I’m sure you can find one that operates locally. 

Another way to follow local trends in food and drink is read the local version of Edible Communities.  Mine is called Edible Piedmont and the Summer 2010 issue just showed up with the other free periodicals outside of my local Whole Foods.  The articles are really well written and the recipes always feature local produce and are often by locally famous chefs.  If nothing else, the ads can give you a great idea of which restaurants and shops sell local food in your area.  This issue features recipes with fresh tomatoes and peaches, two of my summertime favorites!

Another way I keep up with seasonal, local food is by being a member of a CSA.  Community Supported Agriculture is a way to “subscribe” to a local farm and get a box of goodies from that farm every week.  It helps support your local farmers and often exposes you to fruits, vegetable, and proteins (mine even gives us fresh cut flowers in our weekly box) that perhaps you wouldn’t buy normally.  There are lots of ways to find out about CSAs in your community.  One way is through is websites and organizations such as Local Harvest.  You can also just google CSA and your state and you’ll find listings.  Most CSAs will be closed for membership already for this year, but you can get yourself on a waiting list for next year so you don’t miss out! 

You can also find local food blogs and participate in local chapters of organizations like Slow Food USA.  Don’t get me wrong, I am not going to totally give up ingredients I love just because they can’t be grown in NC (artichokes anyone?) but I am trying to spend more of my time and dollars in this way.  I think we all win.  Eat Local!

Posted in Uncategorized | Tagged , , , | 3 Comments